1 Pack contents

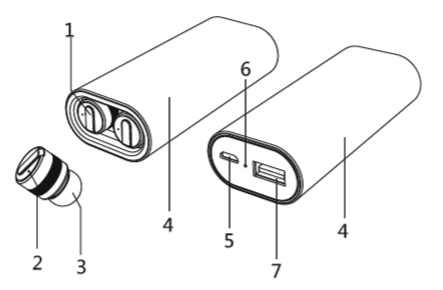
2 Overview
1. Multi-function button
2. Microphone and LED indicator
3. Ear cap
4. Powerbank/charger station
5. Micro USB input
6. Powerbank LED indicator
7. USB output
3 Charging
Charge the powerbank/charger station from a USB port as shown below. Charge the two earbuds in the charger station.
NB: We recommend fully charging the charger station and earbuds before using them for the first time.
3.1 Charging the powerbank/charger station
Connect the USB cable supplied between the charger station’s USB input (5) and a USB port on a computer or wall charger.

3.2 Charging earbuds
The two earbuds will charge on the magnetic contact as soon as they are placed in the charger station.
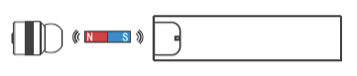
There is a red LED (2) in each earbud that will be on during charging, and that will go off when the earbud is fully charged.
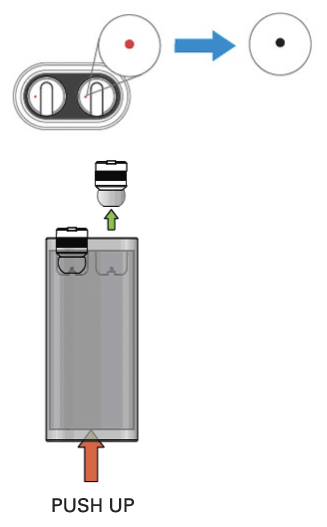
Once the earbuds are fully charged, remove them by pushing up the bottom of the charger station and pulling them out of the charger contact.
4 Using earbuds
4.1 First-time pairing
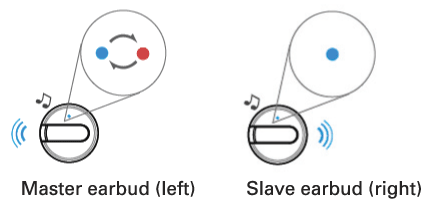
4.1.1 Connect the earbuds to each other
IMPORTANT: Do NOT connect the earbuds to your Bluetooth device yet!
NB: Do not switch on the earbuds yet!
- Hold the multi-function button down on both earbuds simultaneously for 6 seconds, until the red and blue lights flash.
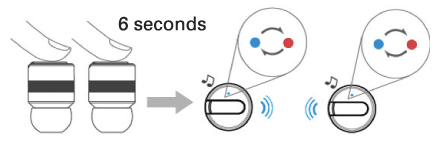
- Wait a few seconds. The earbuds will automatically pair with each other. One will now flash slowly in blue, and the other will alternate between red and blue. The latter is the Master earbud and goes in the left ear.
4.1.2 Pairing earbuds with Bluetooth device
- The Master earbud should be flashing blue/red, see section 4.1.1.
- Search for Bluetooth devices on your device and connect to SandbergBuds.
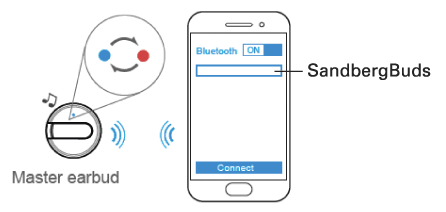
IMPORTANT: If “SandbergBuds” appears twice on your Bluetooth device, wait until there is only one. Link to that one, as otherwise music will only play through one earbud.
- Once your earbuds are correctly connected to your Bluetooth device, the Master earbud will flash blue slowly and the Slave earbud will flash blue repeatedly twice.
4.2 On/Off
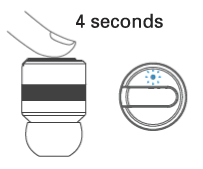
A. Switch each earbud on by pressing the multifunction button (1) for approx. 4 seconds, until the LED (2) flashes blue.
B. Switch off by pressing the multi-function button. As long as the earbuds are connected (sect. 4.1.1), both will switch off automatically.
NB: A flashing red light indicates a low battery. The earbuds should be returned to the charger station.
5 Placing in the ear
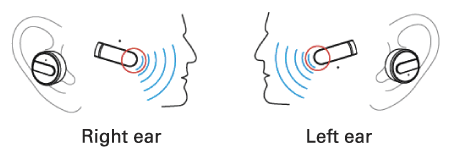
To achieve the best signal, place your earbuds according to the following illustration. The round end of the multi-function button should point towards your mouth.
6 Telephone calls and music
6.1 Telephone calls
NB: Because phone calls are always in mono, only the Master earbud (left side) is active. This means that you will only hear phone calls in your left ear, and only the left earbud’s multifunction button is active.
6.1.2 Functions for phone calls
- Answer incoming calls by pressing the multifunction button once.
- End a call by pressing the multi-function button again.
- Reject incoming calls by pressing the multifunction button for 2 seconds.
- Call the last number used by pressing twice on the multi-function button.
6.2 Music
Playing music: Press the multi-function button (Master or Slave) to play music.
Press again to pause.
The blue light will flash on both earbuds when music is playing.
7 Powerbank function
The charger station also acts as a powerbank from which you can charge mobile devices, e.g. a smartphone.
To charge, connect to the powerbank’s USB output (7).

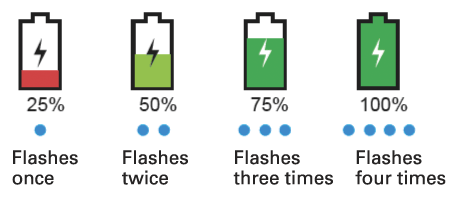
The powerbank status can be seen on the LED in the bottom of the device.

The blue light is constantly lit when fully charged, and will go out when the powerbank is discharged.
The current status can be seen by the number of flashes from the LED. To see status, gently shake the powerbank.
|